
og:image Meta Tag: Optimize Social Media Preview Images
Learn how to use og:image meta tags for perfect social media previews. Covers sizes, dimensions, and dynamic OG image generation.
Table of Contents
- What is the og:image Meta Tag
- Why the og:image Tag Exists and Its Purpose
- How to Implement the og:image Meta Tag
- Recommended og:image Size and Dimensions
- Using Your Logo as Default og:image
- Generating Dynamic OG Images with Vercel
- Comparison of OG Image Tools and Services
- Testing Your og:image Implementation
- Common Mistakes with og:image Tags
- Best Practices for Social Media Preview Images
- og:image for Different Page Types
- Mobile Optimization for og:image Tags
- End
What is the og:image Meta Tag
The og:image meta tag is a piece of HTML code that tells social media platforms which image to display when someone shares your webpage. Without this tag, links appear plain and unappealing when shared on Facebook, Twitter, LinkedIn, or other social media. The Open Graph protocol was created by Facebook in 2010 to help websites control how their content appears when shared. Nowadays, almost every social platform uses these tags. By adding an og:image tag to your page header, social networks can use that specific image as a preview thumbnail. This makes your shared links more clickable and professional-looking. For web developers and marketing professionals, this is a must-have feature. Without it, platforms might select a random image from your page or show no image at all.
How og:image Works in Social Media Sharing:
Why the og:image Tag Exists and Its Purpose
Social media platforms need a way to create consistent previews of shared links. Before Open Graph tags existed, each platform had its method of sourcing images from webpages, which created inconsistent results. Facebook developed the Open Graph protocol to solve this problem, offering you full control over your social media presence. A well-chosen og:image ensures posts appear intentional and branded, leading to significantly more engagement than text-only posts. This means better click-through rates and more professional-looking shares for businesses. Small business owners can use their logo or branded graphics, while content marketers may create custom images for each article. SEO experts know social signals can indirectly impact search rankings through increased traffic and brand visibility.
Open Graph Meta Tag Structure:

How to Implement the og:image Meta Tag
Adding an og:image tag to your website is straightforward. You place it in the head section of your HTML document using this syntax: <meta property="og:image" content="https://yoursite.com/image.jpg" />. The content attribute should contain the full absolute URL to your image file. Most content management systems and website builders feature built-in fields for adding Open Graph tags without code. WordPress users, for example, can use SEO plugins like Yoast or RankMath. For custom websites, you simply add the meta tag directly to your HTML template. Include additional related tags such as og:image:width and og:image:height to tell platforms the exact image dimensions. The og:image:alt tag offers alt text for accessibility. Ensure your image URL is publicly accessible, as social media crawlers need to fetch the image to display it.
Recommended og:image Size and Dimensions
Different social platforms have their own recommended sizes for og:image, but generally accepted standards exist. Facebook recommends 1200x630 pixels as the optimal og:image size. This aspect ratio of roughly 1.91:1 works well across most platforms. Twitter prefers 1200x628 pixels for their large image cards. The minimum size should be 600x315 pixels; smaller images might result in low-quality previews. Ensure your image file size remains under 8MB for compatibility. Facebook won’t display images smaller than 200x200 pixels. The standard 1200x630 pixels size works well across devices without cropping issues. Stick to images where important elements are centered, as platforms may crop edges slightly. Text on images should be large enough for readability, even on mobile devices.
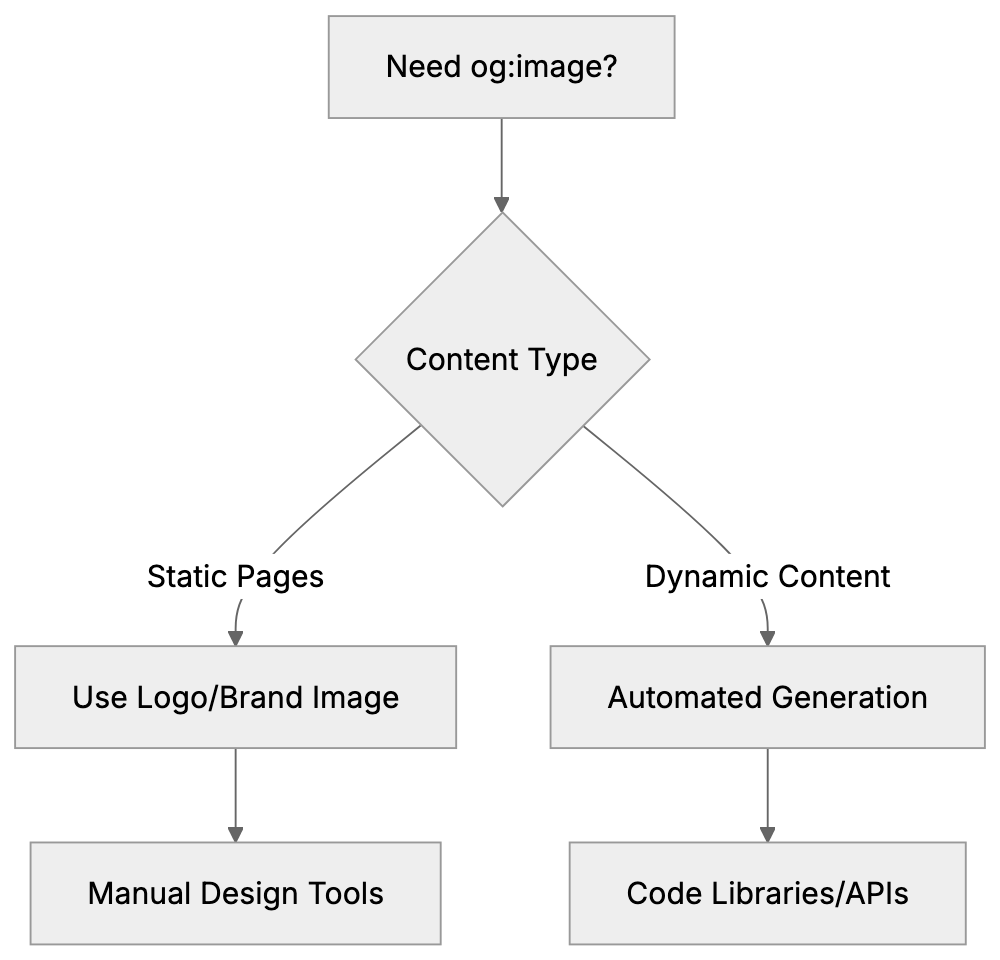
Using Your Logo as Default og:image
Many websites use their company logo as the default og:image for pages lacking specific content images. This maintains brand consistency across all shared links. Small business owners benefit because it’s a minimal-effort approach that keeps branding intact. To use your logo effectively, format it properly. A plain logo on a white background often lacks appeal in social previews. Instead, create a branded template including your logo, company colors, and maybe a tagline. Follow the 1200x630 pixel dimensions. Center your logo and enhance visual interest with background colors or subtle patterns. On pages like your homepage, about page, and contact page, a logo-based og:image is appropriate. For blog posts and articles, custom images might be better. You can configure your website to use the logo image as a fallback when no specific og:image tag is defined.
Generating Dynamic OG Images with Vercel
Vercel offers a library called @vercel/og, letting you generate Open Graph images dynamically via code. This is useful for sites with numerous pages where creating individual images manually would be time-consuming. The library uses Vercel Edge Functions to generate images on the fly, ideal for blog platforms or e-commerce sites. @vercel/og employs a React-like syntax with HTML and CSS to design images, allowing for dynamic elements like article titles and author names. Generated images are cached at the edge, ensuring fast loading. While setup requires coding knowledge, Vercel documentation provides good examples. Images remain consistent in style since they use a unified template. When you update the design, it applies to all generated images automatically, making it more scalable than manual creation.
Comparison of OG Image Tools and Services
Several tools and services exist for creating and managing og:image tags. Options vary from manual creation to automated processes.
| Tool/Service | Type | Best For | Pricing | Changing Generation |
|---|---|---|---|---|
| Vercel OG | Code library | Developers with changing content | Free on Vercel | Yes |
| Cloudinary | Image management API | Sites needing image transformations | Free tier available | Yes |
| Bannerbear | Template-based API | Marketers wanting templates | Starts at $29/month | Yes |
| Canva | Manual design tool | Small businesses, one-off designs | Free tier available | No |
| Figma | Design software | Designers creating custom images | Free tier available | No |
For developers using Vercel, Vercel OG integrates smoothly. Cloudinary provides broader image manipulation features. Bannerbear speeds up the design process, especially for non-designers, with pre-made templates. Canva and Figma require manual work but offer complete creative control. For large sites with many pages, automated generation is more sensible.
OG Image Implementation Decision Flow:
Testing Your og:image Implementation
After adding og:image tags, test them to ensure correct functionality. Social platforms cache preview data, so immediate updates may not be visible when sharing links. Facebook’s Sharing Debugger tool shows a preview of how your page will look when shared and offers cache scrapping to update data. LinkedIn’s Post Inspector and Twitter’s Card Validator provide similar services. These tools are vital for troubleshooting common og:image problems like using relative URLs, images too small or of wrong aspect ratios, or blocked images. Test your og:image across multiple platforms as each handles displays slightly differently. Check both desktop and mobile views to ensure the image looks professional at different sizes.
Common Mistakes with og:image Tags
Developers and marketers often make mistakes with og:image tags. Common errors include using relative instead of absolute image URLs, forgetting proper image dimensions in og:image:width and og:image:height tags, and selecting images too small under 600x315 pixels. Large file sizes can also pose issues due to 8MB limits on some platforms. Center key visual elements to avoid cropping on certain platforms. Failing to test the setup is a critical mistake—debugging tools will confirm functionality. Not updating og:image tags with refreshes also results in content mismatches. This is particularly important for blogs or news sites.
Best Practices for Social Media Preview Images
Creating effective og:image requires more than just meeting technical size requirements. Use high-contrast colors to stand out in social feeds. Add brand colors or a logo for consistency. Integrate text overlays with essential messages, but keep text minimal and legible in thumbnail previews. Avoid cluttered designs; one clear focal point works best. Use high-quality images that aren’t pixelated or blurry. Stock photos are okay, but custom graphics often perform better. Consider creating a consistent template design to build brand recognition. Test images on both light and dark backgrounds and ensure text remains readable. Emotional impact matters; faces in images usually increase engagement more than abstract graphics.
og:image for Different Page Types
Different page types require different approaches to og:image tags. A homepage og:image should represent your overall brand, using graphics with a logo and tagline. Product pages benefit from branded high-quality product photos. Blog post images work best when directly related to the article’s topic. Custom graphics increase click rates. About pages could feature team photos or office imagery. Landing pages should align with specific campaigns, matching messaging and calls to action. Portfolio pages should showcase the best work while category or archive pages might default to a generic branded template. Ensure each page type has an appropriate image instead of reusing a generic image.
Mobile Optimization for og:image Tags
Most social media sharing occurs on mobile devices, making it crucial for og:image tags to look good on small screens. While the 1200x630 pixel size is scalable, you must consider image appearance at thumbnail size. Use larger, bold fonts for text, and test images on mobile devices—not just desktop browsers. Some platforms crop differently on mobile, so keep important elements centered. Avoid fine details that disappear at small sizes. Bold, simple graphics work well, and color contrast is vital given mobile usage in bright environments. Remember, mobile users scroll quickly, so your og:image needs strong visuals to capture attention instantly.
End
The og:image meta tag is essential for controlling how your content appears on social media platforms. Proper implementation ensures your shared links include the intended preview image, rather than random images or no image. The recommended og:image dimensions of 1200x630 pixels fit well across major platforms like Facebook, LinkedIn, and Twitter. Using your logo as a default og:image tag maintains brand consistency. For sites with extensive content changes, tools like Vercel can automate custom og image generation. Always test your setup using platform-specific tools to catch mistakes like relative URLs or undersized images. Following best practices in design and optimizing for mobile will increase engagement with your content. Whether creating images manually or generating them dynamically, having correct og:image tags distinguishes professional websites.
Frequently Asked Questions
What are the benefits of using the og:image tag?
The og:image tag enhances how content appears on social media, leading to more visually appealing and branded previews. This increases engagement and click-through rates, making links more enticing to share. A well-set og:image can also contribute to brand visibility and identity.
Can I automate the creation of og:image tags?
Yes, tools like Vercel’s @vercel/og library allow you to create dynamic Open Graph images using code. This is particularly useful for websites with frequently changing content, as it enables the generation of custom images without manually creating each one.
What should I do if my og:image is not displaying correctly?
First, verify that you're using an absolute URL for the image and that it meets platform requirements for size and file type. Then, use testing tools like Facebook's Sharing Debugger or LinkedIn's Post Inspector to see if there are any caching issues or errors in implementation that need to be corrected.
Is there a recommended image size for the og:image tag?
The optimal size recommended for og:image tags is 1200x630 pixels, which works well across most social media platforms. Ensure the image is at least 600x315 pixels to avoid being displayed poorly and is under 8MB for compatibility with these platforms.
Why might I need different og:image tags for different pages?
Different pages serve different purposes, so the imagery should reflect that. A homepage might feature a logo or branding, while product pages should showcase high-quality images of the products, and blog posts should relate directly to the article content to maximize engagement.
How can I ensure my og:image looks good on mobile devices?
To optimize your og:image for mobile, use larger fonts and keep key visual elements centered to prevent cropping. Testing the image on mobile devices is crucial, as this is where most social sharing occurs. High-contrast colors and simple designs tend to perform better on smaller screens.
What common mistakes should I avoid with og:image tags?
Common mistakes include using relative URLs instead of absolute ones, not specifying image dimensions, choosing images that are too small or large, and failing to test your setup. Additionally, remember to update your og:image when content changes to avoid displaying outdated images.